How to Update Node.js to the Latest Version (Windows, Mac and Linux)
A step-by-step guide to updating Node.js: check your version, choose between LTS and Current, update on Windows (installer, winget, nvm-windows), macOS (nvm, Homebrew) and Linux (nvm, NodeSource), rebuild Docker images, set the version on Render and Vercel, and fix the most common update problems.

MetaSkillGroup
9 min read2

Every few months, Node.js releases a security update, and every developer has the same question: "How do I actually update Node.js on my machine, and on my server?" The answer depends on how you installed it. This guide covers Windows, macOS, Linux, Docker and hosting platforms like Render and Vercel, with the exact commands for each.
💡 Quick answer: Run
node -vto see your version. For most projects, install the latest LTS release (in late October 2026 that means Node.js 24.22.1, or 26.x once it becomes LTS). On Windows, use the official installer,winget upgrade OpenJS.NodeJS.LTSor nvm-windows. On macOS and Linux, use nvm (nvm install --lts). In Docker, rebuild with a fresh base image. On hosting platforms, set the version inpackage.jsonenginesand redeploy. Always runnode -vagain afterwards and restart your app.
💡 Who is this guide for? Students and developers who use Node.js for React, Next.js, Express or MERN projects and want a safe, step-by-step way to update it.
In this guide:
- Why You Should Keep Node.js Updated
- Check Your Current Version
- Which Version Should You Install?
- How to Update Node.js on Windows
- How to Update Node.js on macOS
- How to Update Node.js on Linux
- How to Update Node.js in Docker
- How to Set the Node.js Version on Render and Vercel
- After You Update: Packages and Tests
- Common Problems and Fixes
Why You Should Keep Node.js Updated
- Security fixes. In October 2026, the Node.js security release fixed 10 vulnerabilities, including the Node2Shell Brotli bug that attackers are now using. Old versions stay vulnerable forever.
- Package support. New versions of Next.js, Vite and many npm packages drop support for old Node.js lines.
- Speed and features. Each major version brings a faster JavaScript engine and new built-in features.
- Fewer "works on my machine" bugs. When everyone on a team uses the same version, builds behave the same way everywhere.
Check Your Current Version
Open a terminal (Command Prompt, PowerShell or Terminal) and run:
bash1node -v 2npm -v
You will see something like v24.12.0. The first number is the major version (the "line"), and the rest are minor and patch updates.
To see where Node.js is installed, which helps when an update does not seem to work:
bash1# macOS and Linux 2which node 3 4# Windows 5where node
Which Version Should You Install?
Node.js has two kinds of release lines:
- LTS (Long-Term Support): even-numbered lines like 22, 24 and 26 that get security fixes for about two and a half years. Use these for real projects.
- Current: the newest line, with the latest features but a shorter support window. Good for trying new things.
Here is the status in late October 2026:
| Line | Status | Latest version | End of life |
|---|---|---|---|
| 26.x | Current, scheduled to become LTS at the end of October 2026 | 26.12.1 | 30 April 2029 |
| 24.x (Krypton) | LTS (maintenance) | 24.22.1 | 30 April 2028 |
| 22.x (Jod) | LTS (maintenance) | 22.23.4 | 30 April 2027 |
| 25.x | End of life | 25.9.0 | Already ended |
| 20.x and older | End of life | No more fixes | Already ended |
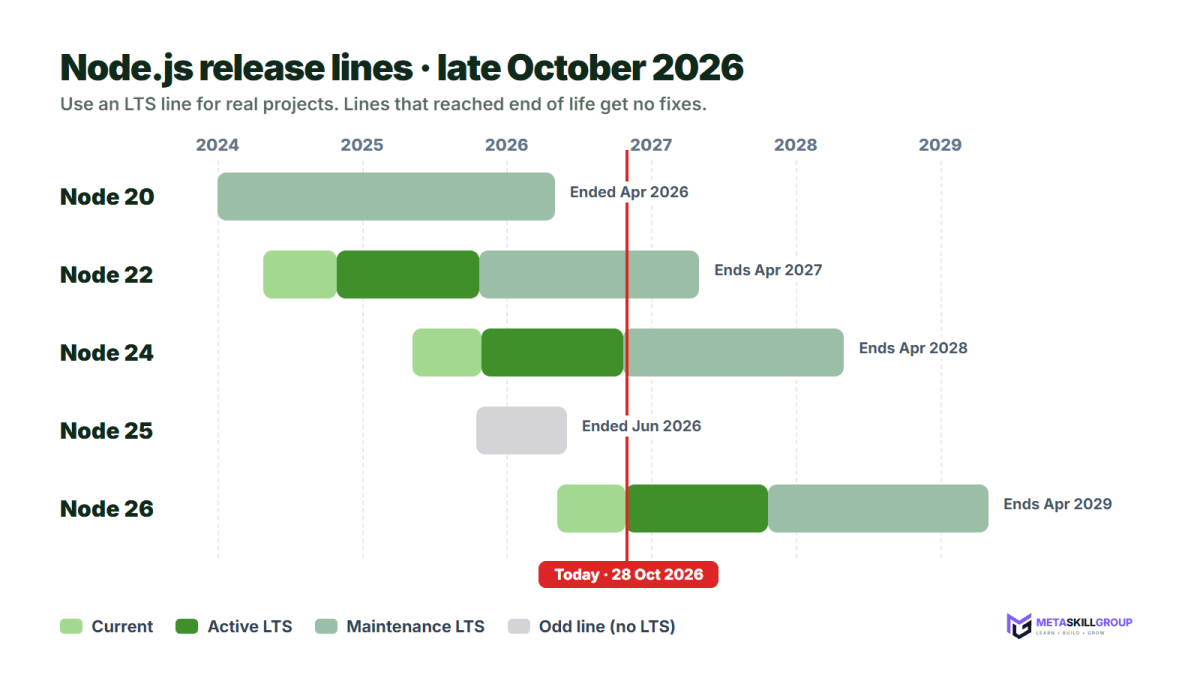
Figure 1: Which Node.js lines are supported in late October 2026. Pick an LTS line for real projects.
Our recommendation: if your project already runs on Node.js 24, update to the latest 24.x. For a new project, choose 24 or 26 LTS. If you are on 20 or older, plan a move to 24 soon, because those versions no longer get any security fixes.
💡 Pro Tip: Updating within the same line (for example 24.12.0 to 24.22.1) is almost always safe, because patch and minor updates do not break your code. Moving to a new major line (22 to 24) is worth a quick test run first.
How to Update Node.js on Windows
You can choose any of these three methods. Use only one, because mixing them causes PATH problems.
Option 1: The official installer (easiest)
- Go to nodejs.org and download the LTS Windows installer (
.msi). - Run it. It replaces your old version automatically.
- Close and reopen your terminal, then run
node -v.
Option 2: winget (one command)
Windows 10 and 11 include the winget package manager:
powershell1winget upgrade OpenJS.NodeJS.LTS
If you installed the Current line instead, use OpenJS.NodeJS.
Option 3: nvm-windows (best if you switch between versions)
NVM for Windows lets you keep several Node.js versions and switch between them, which is handy when different projects need different versions:
powershell1nvm install 24.22.1 2nvm use 24.22.1 3nvm list
If you install nvm-windows on a machine that already has Node.js, uninstall the old Node.js first from Settings → Apps, so the two do not fight over your PATH.
How to Update Node.js on macOS
With nvm (recommended)
nvm (Node Version Manager) is the most flexible way to manage Node.js on macOS and Linux. Install it using the command in the official nvm GitHub README, then:
bash1nvm install --lts 2nvm alias default lts/* 3node -v
To install a specific version instead, use nvm install 24.22.1.
With Homebrew
bash1brew update 2brew upgrade node
Note that Homebrew's node formula follows the Current line. To stay on an LTS line, install the versioned formula, such as brew install node@24, and follow the PATH instructions Homebrew prints at the end.
With the official installer
Download the macOS LTS installer (.pkg) from nodejs.org and run it, just like on Windows.
How to Update Node.js on Linux
With nvm (recommended for development)
bash1nvm install --lts 2nvm alias default lts/*
nvm installs Node.js inside your home folder, so you never need sudo for global npm packages.
With NodeSource (common on Ubuntu and Debian servers)
The version in Ubuntu's own apt repository is often old. Many servers use the NodeSource repository instead:
bash1curl -fsSL https://deb.nodesource.com/setup_24.x -o nodesource_setup.sh 2sudo -E bash nodesource_setup.sh 3sudo apt-get install -y nodejs
If NodeSource is already set up on your server, a normal sudo apt update && sudo apt upgrade brings you to the latest patch of your line.
Restart your app
On a server, the update only takes effect after you restart your app:
bash1pm2 restart all # if you use PM2 2sudo systemctl restart my-app # if you use a systemd service
How to Update Node.js in Docker
A Docker image contains its own copy of Node.js, so updating your laptop does not change it. Your Dockerfile decides the version:
dockerfile1FROM node:24-alpine
To get the latest 24.x, rebuild with a fresh base image and redeploy:
bash1docker build --pull -t my-app .
For fully repeatable builds, you can pin an exact version, such as FROM node:24.22.1-alpine, and change it on purpose when a new release comes out.
💡 Pro Tip: Restarting an old container does not update Node.js. You must rebuild the image and replace the container.
How to Set the Node.js Version on Render and Vercel
Hosting platforms build your app on their own servers, so they need to be told which Node.js version to use.
Render
Render reads the version from these places, in order:
- The
NODE_VERSIONenvironment variable in the dashboard - A
.node-versionfile in the repo root - A
.nvmrcfile in the repo root - The
enginesfield inpackage.json
Render's documentation warns that an unbounded range such as >=20 always resolves to the newest Node.js release, which may be a different major line than you tested. Always add an upper bound:
json1{ 2 "engines": { 3 "node": ">=24.22.1 <25" 4 } 5}
Vercel
Vercel offers only major lines (24.x is the default, and 22.x is also available) and rolls out patch updates for you, including security fixes. You can choose the line in Project Settings → Build and Deployment → Node.js Version, or set it in package.json:
json1{ 2 "engines": { 3 "node": "24.x" 4 } 5}
On any platform, check the build log for the line that shows the Node.js version actually used, and trigger a new deploy after changing it.
After You Update: Packages and Tests
After a major version change (for example 22 to 24), do a clean install and a test run:
bash1rm -rf node_modules # on Windows PowerShell: Remove-Item -Recurse -Force node_modules 2npm ci 3npm test 4npm run build
npm ci installs exactly what your package-lock.json says, so you know any problem comes from the Node.js change and not from new package versions. Packages with native code, such as bcrypt or sharp, are rebuilt for the new version during this step.
Finally, add a .nvmrc file with your version (for example 24.22.1) to your repository, so teammates and tools like nvm pick the same version automatically.
Common Problems and Fixes
| Problem | Likely cause | Fix |
|---|---|---|
node -v still shows the old version | Two installs, and the old one comes first in PATH | Run which node or where node, remove the old install, then reopen the terminal |
nvm: command not found | The terminal was not restarted after installing nvm | Close and reopen the terminal, or reload your shell profile |
EACCES permission errors with npm install -g | Node.js installed system-wide with root ownership | Use nvm, which installs into your home folder |
| App crashes with a native module error after updating | Native packages were built for the old version | Delete node_modules and run npm ci |
| Production still runs the old version | Docker image or hosting setting not updated | Rebuild with --pull, check engines, redeploy |
Final Thoughts
Updating Node.js takes a few minutes once you know your setup: check with node -v, update with the installer, winget, nvm or Homebrew, rebuild Docker images, set engines on your hosting platform, and restart your app. Stay on an LTS line, and treat every Node.js security release as a reminder to repeat these steps.
Managing versions and deployments is everyday work for a backend developer. If you want to practise it on real projects, you can do a free internship at MetaSkillGroup. Our backend development internship is online, open all year and free to apply. It takes about 2 minutes to apply, and your first exam attempt is free.
- #node.js
- #update node.js
- #nvm
- #node version
- #nodejs lts
- #docker
- #devops
- #backend
Related posts
 Node2Shell and the Node.js October 2026 Security Release: What to UpdateThe Node.js security release of 21 October 2026 explained: what Node2Shell (CVE-2026-111497, a Brotli decoder bug) is, how it reaches apps through fetch(), zlib and Express 5, a plain-English table of all 10 CVEs, the fixed versions 26.12.1, 24.22.1 and 22.23.4, and how to update laptops, Docker images and hosting platforms.
 MERN Stack Roadmap for Beginners 2026: A Step-by-Step Guide to Becoming a Full-Stack DeveloperConfused about where to start with MERN? This step-by-step MERN stack roadmap for 2026 takes you from zero to your first full-stack project. Learn JavaScript, Node.js, Express, MongoDB and React in the right order, with a clear timeline, milestone projects, common mistakes and tips to learn faster with AI tools.
 PHP2Shell Explained: How to Check and Fix CVE-2026-109618 and CVE-2026-109619PHP2Shell explained in simple words: what the two critical PHP bugs CVE-2026-109618 and CVE-2026-109619 are, who is affected, the fixed PHP versions, step-by-step update commands for Ubuntu, Debian, RHEL, Docker, Windows and cPanel, temporary steps if you cannot update today, and the signs of an attack to check.
❓ FAQs
Run node -v in your terminal. The first number is the major line, for example v24.22.1 is on the 24 line. Use which node on macOS and Linux, or where node on Windows, to see where it is installed.
Use an LTS (Long-Term Support) line for real projects. In late October 2026, Node.js 24.22.1 is the recommended LTS, and Node.js 26 is scheduled to become LTS at the end of October. Node.js 20 and older are end of life.
Download and run the LTS installer from nodejs.org, run winget upgrade OpenJS.NodeJS.LTS, or use nvm-windows with nvm install 24.22.1 and nvm use 24.22.1. Use only one method, then reopen the terminal and run node -v.
With nvm, run nvm install --lts and nvm alias default lts/*. With Homebrew, run brew upgrade node for the Current line, or brew install node@24 to stay on LTS. You can also run the official macOS installer from nodejs.org.
For development, use nvm: nvm install --lts. On servers, many people use the NodeSource repository: download its setup_24.x script, run it with sudo, then sudo apt-get install -y nodejs. Restart your app with PM2 or systemd afterwards.
Updates within the same line, like 24.12.0 to 24.22.1, are almost always safe. Moving to a new major line can need small changes, so delete node_modules, run npm ci, and run your tests and build before deploying.
LTS lines are even-numbered and get security fixes for about two and a half years, so they suit real projects. The Current line has the newest features but a shorter support window, so it is better for experiments.
Usually there are two installs and the old one comes first in your PATH. Find it with which node or where node, remove the old install, and open a new terminal.
On Render, use the NODE_VERSION environment variable, a .node-version or .nvmrc file, or engines in package.json with an upper bound, such as >=24.22.1 <25. On Vercel, choose the major line in Project Settings or set engines to 24.x.
Yes. A Docker image has its own Node.js. Change the FROM line if needed, rebuild with docker build --pull and redeploy. Restarting an old container keeps the old version.
Comments
Join the conversation
Login to post comments and replies
No comments yet. Be the first!